
40K Style Epic Tyranids
Part of the aim of the "Wolves to the Slaughter" project was to convert the basic Tyranid models to reflect the new generation of 40K Tyranid models. This is the progress of this work and how I went about converting these. After two years of work, it is completed and showcased in Tyranids Parade..
Armour Plating
After modelling quite a few armour platings onto my Tyranids to reflect those on a 40K version, I finally got the effect I wanted. I'm not the first to try this. Here is how I did it.
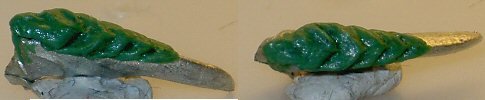
Using the point of the needle, I made a V indentation to form the first plating (one at the right end). Once the general indent was made into how I wanted, the bottom of the V was smoothed to remove where the two points meet. Then the inside of the V which should be raised was smoothed and without pressing too hard, pushed to the edges to make the lines more sharply defined. Sometimes I had to push back the bottom of the V up against the top to raise the edge if I pressed too hard previously. At the ends of the V is where all the green stuff has been pushed to. Using the tip of the needle, the line was extended to the original material and any excess picked off. This was then repeated for each armour plate.
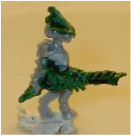
Tyranid Warriors
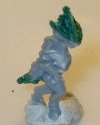
The Tyranid with the gun is the ideal model to use. The gun is cut from the upper arms. The arms on the side were then sliced off and the chest flattened to let you paint a chest plate. The claws on the lower arms were then sliced off too and the weapon directly stuck in its place. This looks rude, but once complete, you forget the conjured image.
|
I sliced a small part of the head off to flatten it, but this isn't required, it is just easier to work with. I stuck a round blob of green stuff on top and flattened it down to make sure it stuck to the miniature. Using a pair of tweezers, I started nipping the green stuff and shaping it. It's just a trial and error really to learn this. Using the tweezer, I pulled up a chunk of green stuff from the main bulk, and squeezing it with the tweezer to flatten it into shape. This was done numerous times to get the end result. Once I had the correct shape, I rubbed the side end of a needle over the surface to smooth out the marks.
|
|
The tail was a simple rolled up green stuff and stuck to the end. Unfortunately this has a tendency to fall off after it has dried and I end up having to super glue it back on.

|
Using plasti-card 0.5 mm thin, I cut the scything claws. I tend to do this roughly as genetics aren't perfect so it doesn't matter if the claws are different shapes. I've used two methods to do the arms. The first adding a blob onto the end of the claws and then a separate rolled green stuff to then attach together. The second method I skipped the first blob and just added the rolled green stuff onto the claws and try and make the other end stick to the body. Once this is done and you have a firm sticking, I then start to think about positioning the arm and shaping it. Using the nipping of the tweezers, you can shape the arms. First time you may make it quite blocky, but practice eventually will teach you how much pressure to apply when nipping the arm together to get a more rounded arms.
|
Smaller details can be added, including shoulder pads. Basically a round blob added and using a needle to flatten it onto the shoulders. Using the point of a needle to merge one side of the blob to the neck. It ends up working out quite well, but sometimes can be thicker than intended. One last detail I added is a wire from the weapon to the arm.
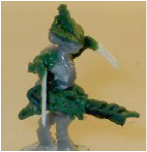
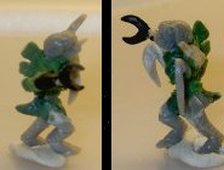
Tyranid Warrior Barbed Strangler
|
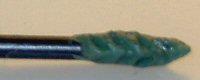
I wanted a single distinguished model so decided to equip one with a Barbed Strangler. Using a banner pole, I added the initial armour plating. This was the first attempt at the armour plating (described above). After all this effort, I definitely waited for this to fully dry before proceeding.
|
|
Another blob was added for the next part of the weapon. I didn't bother with too much detail here other than the spikes at the bottom. I used my tweezers to nip a small lump of green stuff from the bulk. Then pinched it from one side to the next until it was rounded evenly. I repeated this three times. Once all three was complete, I used the point of the needle to push them closer together. Once this dried, I cut the banner pole.
|
|
|
|
The next step was to add it to a Tyranid warrior. The hardest part was getting the green stuff to stick to the Tyranid Model. Maybe I just keep using the wrong mix *shrug*, but its always a problem for me. I think when I finally got the green stuff to stick, the blob that represented the arm was twice as long as the height of the warrior. The stretch of blob was squeezed together and then slowly moulded into shape. Another blob was added on the other side for the other arm. I added one minor detail in the end and that is the wire on the end of the weapon to the arm. This is barely visible in the picture. Once all this was dry, the upper arms were added like the previous models.
|
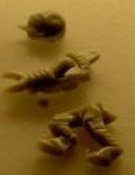
Gaunt Devourers
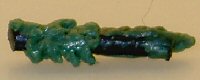
I cut off the front arms and weapon from these and then just bent the head slightly down. Green stuff was then added to the right shoulder of the original arm and then bent to form the arm holding the weapon. Leaving this to dry, a blob of green stuff was moulded into a triangle on a flat surface to form the Devourer. Using a fine needle, I carved the holes in the front, but once painted, was pretty pointless.
Once dry, the Devourer was added onto another blob to form the barrel of the gun and then added to the arm. The left arm was then added to support the front of the weapon.
Once all this was dry, a very small blob was added to the underside of the Devourer and then with a pair of tweezers, nipped to form the forward facing spike.
Hormagaunts

|
The problem with the existing Hormagaunts is that they stand with raised claws that make them as tall as my Tyranid Warriors. I wanted the Hormagaunts to be place in front of the Tyranid Warriors without obscuring them, so it meant converting... them all!
I started off by slicing the raised claws and then smoothed the arm off the head. This makes the head a bit bald, but decided to leave it as is. The upper shoulder was also removed without any forward planning.
|
|
The Hormagaunts looked good as it was, but I wanted them to look as if they had three pairs of limbs and not the now two pairs. To save the effort, I tried using green-stuff to add a pair of small limbs as in the 40K model in between the existing two. This looked miserable, so I went the whole nine yards.
|
|

|
I stuck a blob of green stuff onto where the raised claw shoulder was and stuck on the sliced claw. Trying to get the green stuff to stick to the main body and a good stick to the claw is vital. Once this has been achieved, the green stuff was then shaped to form the upper arms. Once one side dried, I added the other claw.
Each of the models I made, the claws were used to support the model, so these were all on all fours. If you cut the feet, then you could in effect have the on their hind legs, which I didn't bother trying.
|
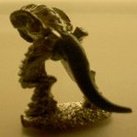
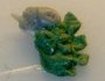
Carnifex
|
I wanted a Carnifex that did not stand too taller than my Tyranid Warriors, so the first version was out of the question. I was tempted to use the smaller Hive Tyrants, but this was too much work. So that left me with the second version of the Carnifex.
I started by slicing off the original limbs and gluing the body to the legs. I then rolled a long piece of green stuff, making one end to almost a point and sticking the other to the back of the main model. The end sticking to the main body was smoothed both the top and bottom part of the model.
|
|
|
The next step was trying to make the head. Instead of trying to do this from scratch, I cut off the head of the many Lictors I have. I was hoping to use the bulk of the head, but in the end, I swamped it with green stuff. I pushed the green stuff away from the tongue and formed the mouth and jaw. This was then stuck into position with a lump of green stuff, leaving enough room to build the rib-cage.
|
|
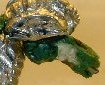
Once all this was dried, I added the armour plating on the head and also on the tail. I opted for the easy spiked tail and added a lump of green stuff to the end of the tail. Pinching bits of green stuff from the bulk and then I squeezed them until they were rounded with my tweezers. I didn't try too hard to keep the ball rounded nor the spikes uniform. It looked more natural if it was all screwed up.
Now the long winded part and where I learnt the best method of doing the armour plating. As described at the top of the page, I added armour plating to the four claws. I was tempted to extend the plates on the legs too, but then decided it was too much effort after completing them for the four claws.
|
|
|
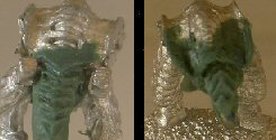
I was planning to add the arms and complete the belly of the beast, but then decided to finish off some other details. The tail and the main body didn't really seamlessly join together so I added some more green stuff on the back of the body and extended it in an armour plate over the top of the plates I already had on the tail. I also extended the plating from the main body over the head. I used the length of the tweezers to nip the side of the green stuff to get the side bits raised. The edges becomes uneven when this is done, so I had to even it out by pushing bit back in or folding it over. This made those areas thicker, so I had to squeeze them flat again and repeated this until the edge was even.
|
|
The belly was quite simple, although I wish I made this bigger. I rolled a length of green stuff and wrapped it around the belly. Then I rolled two more lengths slightly thinner than the first for the following ribs. I then used the tweezers to nip between each one to make a slight join. I did this three times between each rib. Then using the point of a needle, I tidied up the nip.
|
|
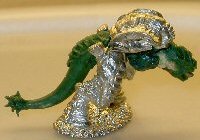
All that was left was the arms and this was quite simple and I didn't do too much. The main problem was that using green stuff which is floppy at start and attaching to the end a heavy pewter claw. Obviously no matter how you pose it, the claw's going to flop down. This took a lot of effort and time, usually including any odd item I could use to prop up the claw. Its also handy to keep checking back to see if things changed. With one claw, I tried leaving it to almost dry and then posing it, but timing is essential if you use this method.

|
Once the claws was set, the model is pretty much finished and small details could be added if required. I added spikes on the top side of the claws and also extended one of the armour plates. I didn't want to add the protruding spines on the carapace because that would make the model too tall. To stop it looking too plain, I added an Adrenal Sac (not pictured here).
|
The second version took much less time to complete. This I added spikes on the jaws, on the front of the carapace and a spiked tail instead. To make the flat spikes, I used a small blob of green stuff and rolled one end to a point to form a cone. I then added it to the model, pushing the base to meld with the model. Then I flattened the whole thing with my tweezers. The point was squeezed back together until it was sharper and then flattened again. Once done, I pushed it slightly to make it curved and flattened it again when required.
BroodLord
|
Before I begin, a word of warning. Considering how rare these models are and that I'll be chopping these up into many different bits, the chances are quite high that it'll cost you more than one model to make a Broodlord. As I have found out previously with my single crouched Genestealer, I lost vital bits and had to cut another model up.
I began by cutting one up, taking the head and legs from the main body. The claws were then carved away from the legs. As I didn't want the legs to be in front of each other, I cut the legs apart and using a small amount of green stuff, stuck them together slightly apart. I didn't want to go any further by remodelling the stance of the legs. I should have cut the tail off as well, but in the end used a bit of green-stuff to flesh it out so it didn't seem to be on one side of the leg. Getting the legs into a good position was a challenge and once done, experience told me to leave it alone until it dried.
|
|
Using a lump of green stuff slightly rectangular, I stuck the head on top and held the green stuff in my fingers. Carefully I used tweezers to pinch a lump of stuff from the main body and then flatten it in the tweezers, trying to shape it into the spines at the back. Once I had the desired shape, I carefully peeled the body from my fingers, careful not to upset the protruding spines. I didn't care much for how the body looked as long as the spines aligned with the head. This I left to dry before proceeding.
|
|
The Bloodlord blade was easy considering I had many blades left from my Hormagaunt conversions. The remaining body of the Genestealer, I sliced down the middle, wanting to make use of the extended claw along with the raised claw. Unfortunately the latter was missing from the model I used which was partially damaged and had to steal from another. This I also had to cut to re position the arm so it was less bent.
|
Putting it all together was the hardest. I first tried to put the body and legs together and found that although the green stuff has dried, the legs were still fragile. Separating what I had, I tried again but adding the arms to the body first. But once again, green stuff don't dry that easily and I ended up flattening the spines I made. Luckily it needed only a bit of retouching. Once the arms were in place, a small amount of green-stuff was added to flesh out the flat body.
The last task was putting the upper half to the legs. This may sound simple, but I hadn't stuck the leg to the base which I think would have made life easier.
|
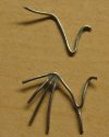
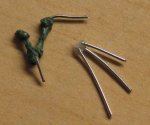
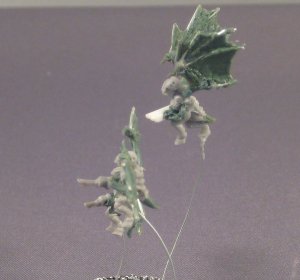
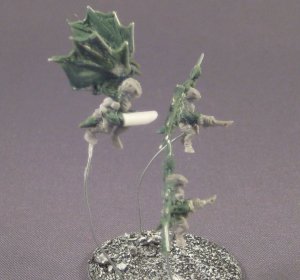
Wings
I found wings to be the most frustrating and soul destroying experience. A set of six wings took me over a year to complete as the thought of trying to work a little bit more drove me away. The key to be able to make this is Ultra Gel Super Glue. Without it, the wire frame would be very hard.
|
To start off, I tried to create the wire-frame for the wings. Working with such short length wires was hard enough never mind trying to get the lengths relatively the same for each pair of wings. I then glued the wing tips in place, however I realised that I'd still be breaking them.
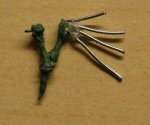
First step was to build up the arms. I just visualised a set of bones and worked with that image. The wire for the wings are likely to fall off as you do this, but leave them! Hind sight, I should have glued this after I finished the arms.
|
|
|
Next is probably the hardest part. I started off with a relatively small blob flattened out between the wires and getting GS to stick to the wires is quite hard. Once you get most of the GS stuck to two wires, its just a matter of using the tweezers to press and squeeze out the green stuff so the wing patagium is thin enough and leaving a small thick bit at the edge of the wire to represent the bone. Once this is complete, then you just need to curve the edges and gently push the centre back to create a small curve that captures the wind when in flight.
|
|
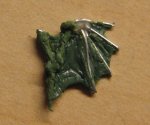
Once one of these is complete, then always leave it to dry and work on the next section the following day. Too many times I couldn't wait and messed up my attempt. Once complete, another good thing about this super glue is that it solidfies and acts almost like GS.

|
|
