
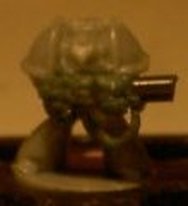
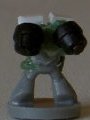
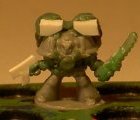
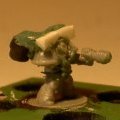
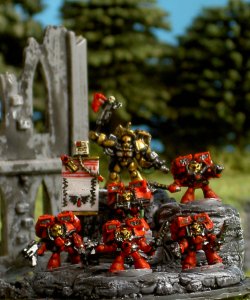
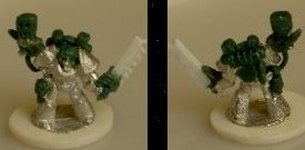
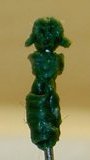
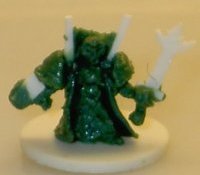
Commander Dante and Honour Guards
Despite all the different ideas, I was a bit tired of painting, so decided to do something small. I wanted to do more Phoenix Lords, but meant I had to do the supporting Troupe. So I flicked through the Blood Angels Codex and came across Commander Dante.
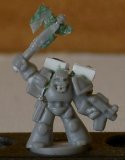
I didn't want to use the standard Assault Troop, not only wrong face, but wrong jump pack type. So the only option was the Tactical Marine. Now this was a challenge as they were in a static pose and no-one converts these. Now that I was more confidant in my skill, I decided it was time. So I set about with the Honour Guards.
I didn't want to use the standard Assault Troop, not only wrong face, but wrong jump pack type. So the only option was the Tactical Marine. Now this was a challenge as they were in a static pose and no-one converts these. Now that I was more confidant in my skill, I decided it was time. So I set about with the Honour Guards.
Small Steps
|
So the first step was to test how I could convert these. Taking a Tactical Marine, I carved the bolter off and changed this to a Melta Gun. Simple really, but the jump packs were still yet to come. That would come later as from previous experience... let the green stuff dry.
|
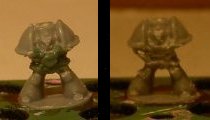
Then came the small rectangle piece of the belt. Learning from past experience, small steps were needed, so I added the belt and left any ideas like grenades on the belt till later (which was later forgotten anyway). For small steps, I seemed to do quite well
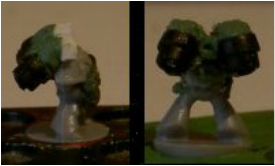
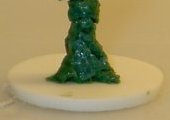
The next Step
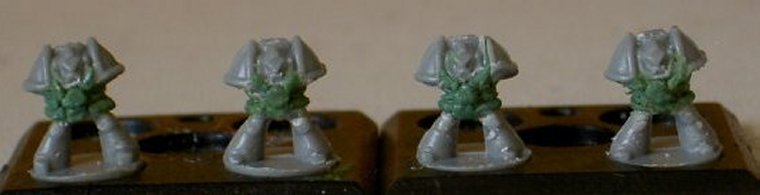
Before I started on the next step, I had to do the same for three others and the first one always looked the best (second from the left). I guess the others I was just happy to get over and done with.
|
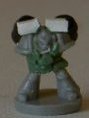
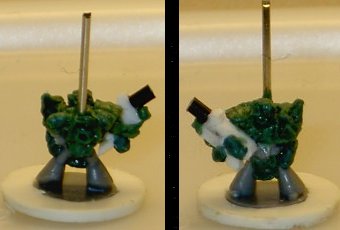
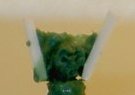
So the next choice was arms or jump pack. Well arms were always so easily damaged, so it was the jump packs. I tested this out on a spare figure before attempting it on one of the four partially converted. I sliced off the back from just behind the head, so I lost the back half of the shoulder pads. The jump packs would hide this anyway. The top part was cut off too to mount the air intakes. I used some plastic card for this. I used two stubs from the old epic banner poles to form the jump jets and stuck these on using green stuff. I would later use green stuff to complete the jump pack. This worked nicely, but I had to repeat it for the other four :(
|
|
The Weapons
|
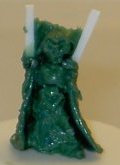
Before starting on the weapons, I finished off the jump packs by adding a small amount of green stuff between the banner stub and the air-intake to form the funnel. Unfortunately several times these two components came off the SM and I had to stick the bits together again and re-shape the funnel.
|
|
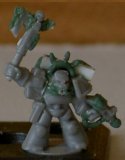
I used thin plastic card for the bolt pistols and just cut the outline of the shape, although a bit plain, I was happy for now. The next weapon I looked for was a plasma pistol. I found a las pistol previously chopped off an Eldar Warlock. I added a bit of green stuff to the end and it rounded this off nicely. While looking for this, I came across an unknown plastic bolt pistol left over from somewhere. This was used for the remaining figure. All I had left now was to find two power axes or somehow make them... hmm... think I'm stuck.
|
Completing the set
I added more detail to the bolt pistols made from plastic card by adding a layer to thicken it out to form the ammo mag. The axe was cut from very thin plastic card and then using green stuff to pad it out. I just haven't got around to cleaning up the edges from the green stuff.

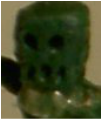
Commander Dante at last
|
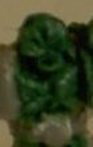
I used the Chaplain from my plastic sprue. I cut off the backpack and some of the shoulder pad to mount the plastic card forming the jet intakes using the same method as the others. I then sliced off the staff ends. Using one of these ends, I tried to shape it into the axe and used green stuff to pad it out a bit. The mounted jump pack came off the shoulder, so trying to work with this, I decided to cut the shoulder with the axe off the body. It was rather pointless, but meant I could work without damaging the axe. I pushed a pin into the mouth to open it up and added the small details onto the face, the bolt pistol and the halo above the head. I then glued the arm and the jump pack back onto the figure.
|
|
All that was left was to paint him (I finished painting the others) and a base. Originally I intended the honour guards for a 4x2 base, but wasn't sure whether to mount Dante on a separate base, or the same. So finally I decided to mount them all on a round base. Of course, I've yet to do this.
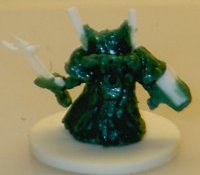
Commander Dante and Honour Guards
|
I used a 33mm diameter plastic card cut using a circle cutter. I used Milliput to make the stones instead of green stuff as it was cheaper and also it dries much harder. I tried to use the model's base to make an imprint into the milliput so I could mount these like the bases. However this didn't work out too well as I hoped as I didn't think to use any powder to prevent the milliput from sticking to the base. Once the photos were taken when a short (and I mean very short) spell of sun broke through the gloomy clouds that hung in the sky, I used a dab of paint to keep them stuck to the base. The theory behind this is so if I ever drop this, the pieces break off easily from the base rather than snapping off at the legs. I've done this many times and always impossible to glue together at the legs. The other benefit is if I ever decide to change the base, I could easily pull them apart too.
|
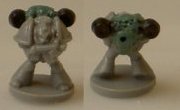
Space Marine Backpack
|
I didn't want a bog standard Tactical Marines so I thought I would try and add the newer and larger backpacks to the standard marines. I used the ends of epic banner poles to make the first one, but they looked too big. I was hoping for an easy solution. Instead I pulled them off my first prototype and had to use green stuff to finish it off. This was not a quick solution as you had to have equal portions and then have to sculpt them same as possible. The final result I liked and dubbed it the telephone backpack, because that was what I thought it looked like.
|
|
|
The first step was to roll a cylinder and push it onto the back, ensuring it sticks first. Then flatten it a bit, ensuring that it fits between the shoulder pads. Any excess can be dealt with later. Once you have the basic rectangular shape, I took a small blob and pressed it onto the back. Using a pin, I opened up a hole. Using the flat side of a pen knife, I flattened this off, using tweezers to pull it back up (if too flat) and using the pin to open it up again until it was raised with a flat surface. Once this was done, it gave it the basic look and everything can be based on that. I shaped the top part of the backpack and also added the holes. Below the blobbed hole, I pressed down on this to make sure it was lower levelled than the rest and pulled any excess off before shaping it slightly pointed.
|
|
Once this dried, I took equal amount of green stuff and rolled it into a very small oval shape. Using a pin, I pressed one side of the blob onto the side and just using my thumb to push it down. If done gently, it curves it just right. I didn't do much detail on this part, as you can imagine you have to do the same for the other side and get the two to match as much as possible. So I kept it simple. Once this was complete, it looks just like an old fashion telephone. I was thinking of adding more details to the lower half, but decided this was probably enough.
|
|
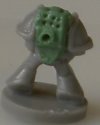
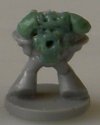
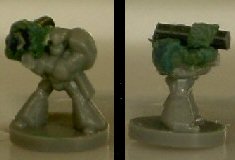
Furioso
|
A chunk of green stuff was added to the right arm and I tried to shape it into sharp edges. It was a waste of time as once this dried, it was easier just shaving it into shape with a penknife. An arm was reluctantly cut off another dreadnought with the bolter underneath it removed. Then began the slow process of molding a flamer with a bit of brass rod I found lying about. Thinly rolled stips of green stuff was then added between the flamer and the back of the dreadnought arm. Finally some additional details such as the flaps on the side arm and an almost visible grenade launcher on top was added
|
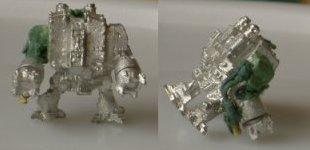
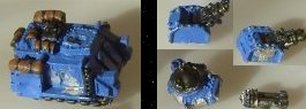
Baal Predator
|
I used an existing Predator tank to make my Baal tank. The side flamers were already present and only the turret needed changing. The side-sponsors had rolled packs which I clipped off and then to hide the awful work, I planned to mount these on opposite sides so the cuts were at the bottom. Lacking the necessary tools to cut the remaining rolled-packs off the main hull to a good standard, I decided to use a plastic Rhino and clipped off the side hatches and top bolters.
|
|
I drilled holes in the side and top to fit the turret and side-sponsors too. With a little engineering, I was able to pin the turret so it would swivel with a little green blob on the other end of the pin to stop the turret from falling off.
|

|
Brother Corbulo
The plastic Chaplain seems to be an easy model to use for many conversions. Once again a chaplain model was used for Corbulo, but I chose a pewter model instead. This was much harder to convert as not having the ideal clipping tool, carving the back-pack off was quite hard. The bolt pistol was removed and the mace was clipped.

|
The first step was to improve the skull face on the chaplain. Small blobs were added on either side of the eyes to flesh out the head. It didn't matter that I filled out the eyes as poking a needle into it solved that problem easily. Small amounts of green stuff was added to the head to try and make it look like some hair.
|
|
Next came the goblet. A blob added to the top and shaped into an oval and using the flat side of tweezers, flatten the top. Using a needle, I added the eyes and carved the teeth into the goblet. Small amounts were added to the hand to form the arm needle. With the remaining green stuff, I added the two small grenade like instruments on his hip.
|
|
|
Scouring the GW on-line shop, I found a rear view of the back-pack. Using similar technique to the Tactical Space Marines, I made the medic back-pack. The final touch was the things on top. I modelled these separately and thought to let it dry then gluing it on top. Knowing my usual lack of patience and probably loose the small pieces in the process, I added them to the back-pack. Luckily I didn't spoil the existing details.
Last came the sword. Using very thin plastic card, I cut the teeth very carefully using two very carefully placed cuts. I then added a further piece of plastic card on top to give the sword an additional layer. Even though the rest of the model had not dried yet, I continued to add the sword to the model. To my relief, I didn't screw up any existing features.
|
Captain Tycho

Resisting the temptation to use yet another Chaplain model (running out quickly) I turned to the space marine captain. I removed both arms and then carved out the head. Now this would be the first model that I would sculpt a head. Instead, I started off with the cloth between his legs. This was quite easy, nipping the edges before flatten it between tweezers to get the corners. Occasionally I had to push it forward from behind. I tried to smooth the surface with little success, but gave up as hopefully the paint would cover the needle marks.
|
Looking at the 40K model, the head was above the shoulder pads. As the space marine captain was smaller than the others, it left me with a few options. I covered the head with green stuff and formed the chest. I simply pressed down the green stuff beneath the chest plates. Using my all important needle, I moulded the slot where the head would go.
Using a blob of green stuff the right size for the head, I placed it into the moulded slot. Perfect... until I tried to add detail. It took quite a few attempts, starting with poking holes for eyes and mouth and then trying to shift things. Using the needle, I could push in the green stuff at either side of the mouth to get a chin. I made the mouth more horizontal as too many models where shouting. Instead of waiting for all this to dry, I decided to add in the eye piece. This flattened the head a bit, but the result was satisfactory. The head would be rounded a bit once everything dried.
|
|

|
Not content on wasting the last bit of green stuff, I worked on the shoulders. At first I plonked all of it on and smoothed it with my fingers and tried to sculpt a border. But trying to remove the excess spoilt it all. Starting again, I put a smaller layer on the shoulder to flesh it out . With the last bit, I worked on the wing decoration. Flatten this, I pushed a corner onto the green stuff that padded out the shoulder pad and with tweezers and needle, carved out the wing. I amazed myself with this one, although I can't really explain how I got the result..
|
|
The gun was cut from some thick plastic card (which I wish was thinner later). I used the old epic banner pole for the gun barrel. I found it extremely annoying trying to get green stuff to stick to this. I attempted to make the second barrel under the main with green stuff, but this later came off and re-added when this was complete.
When attempting to add the gun to the model, I found it too thick that it would protrude from the model too much. So I had to cut off the shoulder pad and remodel it to compensate for the thick gun.
The final stage was the back pack. I snipped a pin to use for the banner pole and used the same technique for the Tactical Marines to make the back-pack, but with the pin sticking out.
|
|
Chief Libarian Mephiston
|
Starting with a blob on a long wire, I started to try and sculpt the head with the point of my needle. I didn't try too much due to it being my first attempt at this. I tried to add the hair line on his forehead and then once done, added small bits of green stuff to the side to form his hair at his shoulder. They looked more like women's plat then anything. I wasn't satisfied with the work, but thinking ahead, the paint will probably hide the details I tried to do. I think I should have left the face smooth and paint the features instead.
After some other sculpting, I had green stuff left over, but not enough to work with. So I added it to the wire to form the chest and bottom half of the body section.
|
|
Once this was all dried, I cut the wire and got a chunk of green stuff to add around the bottom half of Mephiston. This was then stuck to the base and the inner dress was sculpted. The main feature was the left leg protuding forward and the visible foot. I tried to sculpt the folds in this with the needle point with little success and smoothed it out instead.
Next came the chest. I wanted to sculpt the chest plate and the belt, but ended up with slightly different effect instead. I didn't want to try too hard at this stage.
|
|
|
Getting a very thin piece of plastic card and cutting them into two long strips, I put green stuff in between it. Flattening the green stuff to form the high collar. Then I had to pry it from the table and flatten it again without it sticking to the table again. Once finally done, I wrapped this around Mephiston's head.
|
|
While this was still wet, I got a large bit of green stuff and flattened it a bit so I could wrap it around all of Mephiston to form the cloak. The top rear of the cloak was smoothed into the high collar and the front was smoothed into the plastic card. The hard bit was getting the edge and corners of the cloak. This was done with a combination of nipping the green stuff together and then flattening it again in the tweezers and smoothing the edges with the needle. This took a lot of effort and when complete, I had to shift it into position so the cloak did not look too static.
One failing in the cloak was estimating how much green stuff to use. The back bulged too much. Nipping the excess together, I realised that if I tried to remove this, it would tear the rest of the details away. So instead, I shaped this immediately into the back-pack.
|
|
Using the eye of the needle, I made the ripples on the back of the cloak. To my amazement, the result was perfect and I wish I tried this with the front of Mephiston's skirt. With the last bit of green stuff during this session of work, I added a blob to represent the skulls on his shoulder and the wires leading to the where the shoulder pads would be.
|
Using thin plastic card, I tried cutting the shape of the sword. First attempt resulted in a sword the height of Mephiston. So it took a second attempt with less ambition. I added green stuff to form the hand and handle. Once again estimating how much green stuff to use for the shoulder pad was annoying. This was shaped first before the hand with the sword stuck to the shoulder pad.
|
|
Once everything dried, I worked on the remaining arm. Unsure what the shoulder pad skull looked like, I decided to just make it plain and paint the skull on later. I got a bit lazy with the plasma pistol and just cut off a bit of plastic card and added a little green stuff to round off the barrel. The final touch was to add small blob onto the top of the collar and the hand guard of the sword (not shown in image).
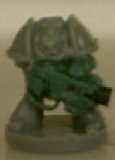
Heavy Weapon Marine
The first 10 man tactical squad contained two marines with flamers. I used the same method as the flamer in the Assault squad. For the second tactical squad, I decided that I needed some long range support and decided to have a marine with a Heavy Bolter and Rocket Launcher.
|
The front of the Tactical marine was cut off and I was intending to sculpt the front of the marine like the Assault Marines, so the HB would be held away from the body. Wanting an easy start, I decided against this. I used an old epic banner pole as the starting point and using green stuff, shaped the main body of the weapon. using the point of a needle, I shaped the hand holding it and the indent at the barrel. Once dried, I then added the arm holding the top of the weapon and the wire underneath.
I wanted to use a normal Tactical Marine for this, but as the shoulder pads were not in the right position, the Devastator Marine was used instead. The missile launcher was cut off and most of the right shoulder pad too. An old epic banner pole was used for the missile launcher and green stuff wrapped around one end and stuck to the model. The green stuff was then shaped to form the front casing.
|
|
The main body of the Heavy Bolter back-pack was made first, using the needle to add in the indented lines. Once dried, the round blobs of the back-pack was added followed by the ammo feed. I wanted the ammo feed to be flat and not rounded and tried to do this with a tweezer once added to the model. I was met with little success, but in the end left it.
The missile launcher back-pack was based on the latest 40K model and I took a different approach. I made several short rolls to represent the missiles. I should have just rolled a long bit of green stuff, let it to dry and then cut them up. Then I used green stuff to stick them together and build the casing. I was intending to build the mechanical arm that loads the missiles too, but opted for the easy way out and just added round blobs to finish it off.
|
|
The Base
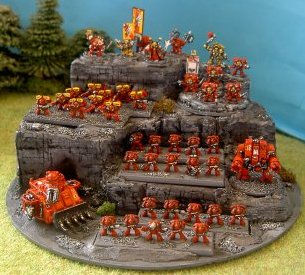
|
I used an old CD to start the base off and cut several blocks of foam to the height I wanted. I didn't bother trying to fit each block together neatly. I then used Milliput, which is cheaper stuff than GW green stuff. Unfortunately using this to fill in the gaps proved more trouble than it was worth. Firstly this stuff leaves a messy residue on your hands and also trying to imprint the model bases on them where quite hard. With a lot of effort, the result seemed worth it.
I used a foam cutter and pen knife to add in horizontal and vertical marks to the foam and the Milliput. I can't remember where I read how to make these marks, but the cuts are basically random and staggered all over. I'll probably describe this in another project though, but creates a good cracked rock look.
Rather than pulling off Commander Dante and the Honour Guards off the existing stand, I made sure while making the CD base that I had sufficient space just to mount the existing base on top of this. Basically a base upon a base lol. All that was left was adding a touch of foliage and finish it off.
|
