
Tau Battlesuits
The following is the guidelines I used for making my Tau Battlesuits. These have been easy to make only because I have various size rods and square strips purchased from "Evergreen Scale Models" (Item No provided in guide). I also have sheets of plastic card in various thickness, but primarily 1mm thickness is used. Some sections 1,5mm is probably better to make the body bulkier, but it just depends what is available and personal preference. I used a liquid glue that slightly melts the plastic to make a bond.
|
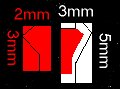
The measurement is for the full piece before any cuts are made. The cuts are eyeballed so no exact measurements. The white piece is sandwiched between the two red. This forms the body using 1mm thick plastic, but I think 1.5mm would make it look better and bulk it up a bit. Compared to the Battlesuit, the red panels have extra angles that I didn't want to go into replicating.
The bottom part of the white will be where the legs are glued to. |

|
I use a scrap piece of plastic to stick to the back of the body. Once it is dry, then I slice off the edges. Although a bit wasteful, I didn't want to measure and cut the piece, then later realise I miscalculated. This piece will be where the arm is glued to and also the side panel of the Jet-pack.
|

|
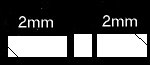
The jet-pack side panel is probably the most difficult to shape. After the top two angle cuts, there is a very minor indent before the long diagonal cut downward. The 2mm is from the top before I cut the red piece off and use for later.
I use 0.75mm square strip for the exhaust (Item No 131). I glue the tip onto the jet-pack before cutting it. The glue usually has not dried fully allowing me to adjust it. I glue two to the long diagonal cut and one on the bottom diagonal cut. |
Once the three exhaust pipes are glued on, I then re-use the red piece and cut a bit off before gluing it back onto the same place. This way the end of the red piece ends at the tip of the bottom exhaust. Leaving a gap between the top piece (see next image).
After making two of these I try and decide which side looks best and ensure this faces the outside of the Battlesuit. I add a piece of rod 1.2mm (Item No 221) to the outside that reminds me which side they are to glue onto the body.

|

|
The next two steps can be done in the opposite order, but I prefer this route as it means less room for error, depending on how well you can eyeball the width. First I gently glue the top part of the jet-pack to the main body and adjust it until I'm happy. This isn't firmly mounted as the next step provide more contact.
|
The second step is the rear of the jet-pack. I use a white square piece to pad out between the two side jet-pack. Usually one 1mm thick plastic is sufficient as it depends how deep the gap is. It doesn't need to be exact width, but if it is the edge of this square piece will stick to the jet-pack side panels and hold it to the main body. I then add a piece of 1.6mm rod (Item No 222) to the centre of the white square. I then slice some plastic card very thinly and insert it between the rod and the side jet-pack (the subtle green in the image). If the white square did not make contact with the side jet-pack, this small green piece will provide the contact to hold the side jet-pack to the main body. Although there should be a gap between the green panel and the blue rod, this usually doesn't happen for me.

|
I just use spare 1mm thick plastic for the middle exhaust and eyeball the length, but usually 1mm high and 2 mm long. This just glues to the middle of the main body, overhanging above the blue rear rod of the jet-pack. The other small piece goes under the blue rod.
|

|

|
The upper legs is made from 1.5mm square strip (Item No 153). I originally made these 2.8mm long, but made it difficult to keep each Battlesuit the same height. Hence 3mm worked just fine. Slicing the edges was difficult, but I have enough finger nails to keep it still while trying to do this. The edge of my tweezers was the correct width to make the gap at the bottom of the leg. Originally I made some cuts first, but later found that applying enough
|
pressure on the tweezer, I could squash the plastic to the bottom to create the rectangle hole I needed without making any cuts first. Then I use the tweezer to push it back into shape and cut off the flattened plastic from the back. There is a small diagonal cut at the top side of each leg so that it gives more surface to mount onto the main body,

|

|
Joining the legs is the hard part as it depends on how you want to pose it. The upper legs is glued to the central body as mentioned in the first stage. The lower leg is made from 0.75 square strips (Item No 131) and cut to 3mm length, however originally I had 2.5mm length. This is glued to the other part of the leg and this is where the most difficult part that I found with making the Battlesuit.
|
Depending on the pose, the bottom part of the leg must touch the base at the same height, otherwise the Battlesuit would be off balance (unless that is your intention). Once this has dried, using the same sized rod, I make three toes with a bit of slice at the end. While holding the model as close to the base as possible, I glue on the toes. If you get this right, the toes will form the base for the Battlesuit to stay free-standing. Although balance of the upper body can cause this it to topple. This didn't matter much later as I glued it to the base anyway.
I made the inner toe shorter than the front and outer toe. I didn't go to the length of duplicating the original model's foot as it would be too difficult. They currently look bigger than the Forgeworld Battlesuit toes, however it does give it more stability.

|
The head was made from 1mm thick plastic card, however 1.5mm proved better. Small angle cuts were made to the front to give it a bit of shape. The antennas were made from thinly sliced plastic. A piece of 1.2mm rod (Item No 221) was added to the body for the neck before mounting the head and adjusting to the direction I wanted the Battlesuit to face.
|

|
|
I used some 1.2mm rod (Item No 221) to stick to the main body so that the shoulders mount slightly away from the body. This was mentioned previously. The arm was made from 1mm square strips (Item No 142) cut to 2mm in length. A diagonal cut is made for the top of the shoulder and the end where the Battlesuit hands would be. This is joined by a 1.2mm rod (Item No 221) cut to the thickness of the arms.
|
As the two arms is joined by a rod, it meant that the you can easily adjust how the arm is bent and pose it quite nicely. A generous amount of glue on the shoulder rods melts the plastic so that the arm can be angled differently by squashing the melted plastic into the right angle needed.
That's the Battlesuit finished and all it needs is some weapons that hopefully doesn't need any guidance. At the time of writing this article, even I haven't made the weapons yet. One final touch I added was a thin slice of plastic to the back of the leg to form an ankle. I added this originally to give the model that last bit of stability to stop it toppling backwards and make it free standing. However I liked the look that I added it to the other models even though I had glued them to the base.
Tau Weapons
Burst Barrel
Base - 2.5 mm. 4x Barrel 2mm + 0.5mm tip, but start off with 1mm.
Round base holding barrels is 2mm (Item No 212) that provide gap in between barrels, but harder to make. 1.6mm (Item No 222) makes barrels sit together, but easier to make.
Plasma Barrel
4 mm Base - 4 mm length using 1.6mm rod (Item No 222)
Fuel canister 0.88mm rod (Item No 220)
Fusion Barrel
4 mm Base - 4 mm
Furl canister 1.2mm rod (Item No 221)
Flamer
Barrell 1.2mm rod (Item No 221). Red button 1.2 (Item No 221)
|
Rail Gun - Overall length 20 mm
Barrel - 5+1 mm length using square 0.75 (Item No 131). Although if making some in future, Use 7 mm and manually make the 1 mm bar guide (was 1 x 3) as trying to align and cut the 5+1 mm doesn't always work out. Gap in between is not 0.75 square, but thin card 0.5 mm. Gun tip piece is 3 x 2 mm. |

|
Main body is 5 x 3 but almost 6 mm in length. End gap 1.5 mm. End (red) 0.05 inch x 3 mm tall. Side panel covering main body is 0.5 mm thick plastic sheet.
Missile Pod
For Battlesuit 0.15 x 0.1 inch. For Broadside, 0.1 x 0.1 inch. Missile is 0.64 mm (Item No 219). Missile tip 1 mm and end is less, but stick onto the body and then trim after. When making the Broadside pod, make each pod and glue missile on before sticking two together.
Tips: Roll the rod on the table and use the edge of the sand disc to slice the tip. Remember the aim is to smooth the rod edge rather than sand it to a point. Angle is much sharper and less control, but method is quicker. Line up the missile on the table and add glue to base and slide it onto the lined up missiles rather than trying to pick up each missile tip and gluing it onto the base (less likely to lose it).
